| General Information | | You can prepare your book or booklet for printing in any DTP or office programme. However in case of office programmes remember that you will have only limited options of page editing and no control over colour mapping.
Please prepare only one file including all book pages (also empty pages).
You do not have to bother with imposition or binding of your artwork - we will do it for you.
|
|
| Sizes | | Final Trim Size | There are 3 utility sizes to choose from:
A4: 210 x 297mm
A5: 148 x 210mm
B5: 172 x 250mm | | Full Bleed Size | Because booklets are not trimmed after printing, the full bleed size is the same as the final booklet size.
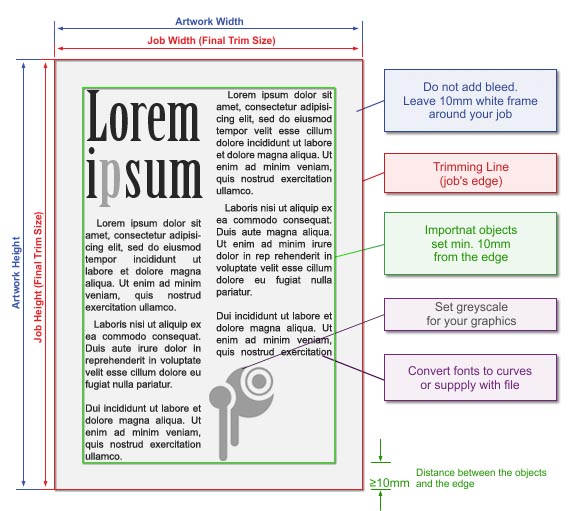
| | Margins | Text and graphic elements should be placed at a distance of at least 10 mm from the edge of the page. Do not extend graphic elements to the bleed area; the press does not print up to the edges and the printouts are not trimmed after printing.
For practical reasons (easy opening and good readability of the book, identical distances between text and edges), centring the text on the page and adding margins (e.g. 2.5 cm) is recommended. Moreover, when designing different left and right margins, keep in mind the mirror image for even pages.
|
|
| Cover Preparation | | Cover Size | You can prepare the cover in the same way as the inside pages. Place all pages of the booklet in one file, with cover pages inserted as the first and the last page of the booklet. In case of a one-sided cover, insert empty pages for the internal side of the cover.
If you need graphics extending over the spine from the first to the last page and preparing separate pages would be troublesome, you can prepare the cover in a standard way as a separate file containing the front and back cover. | | Margins | Text, graphic elements and background should be placed at a distance of at least 10 mm from the edge of the cover (there must be a 10 mm wide white band at the top and bottom edges of the cover).
Because booklets are not trimmed after sewing and there must be a margin for print, graphic elements cannot be printed up to the edge (in the bleed area). The only edge that is trimmed is the edge opposite the spine, where you can place graphic elements in the bleed area. Please remember that in thicker booklets, a part of the cover is taken up by the spine, which means a narrower design area.
|
|
| Graphics & Texts | | Colour Model | Black & white pages are to be set in grayscale.
All colours (texts, graphics, photos) have to be set in CMYK colour space. We do not recommend using RGB colour space as mapping of RGB colours on the printout may differ significantly from original. | | Rich Black | | For a full dark black colour, use 100% black with no added CMY components (unlike in offset printing). | | Graphic elements on the spine | Due to heavy load during booklet folding and spine shaping, micro-cracking of the toner may appear on the spine. That is why using highly saturated colour elements on the spine or up to 15 mm around the spine is not recommended. It is especially not advisable to use solid black.
| | Tone Gradation | Do not set your tonal range for values smaller than 5%.
To avoid visual bands, add some noise to your gradation.  | | Optimum Resolution | | Optimum resolution for bitmaps (graphics, photos) is 300dpi.
|
|
| Saving to File | | File Formats | Preferred: PDF
Accepted: CDR, TIFF, JPG (not recommended).
Please note: In case of INDESIGN software, we accept only PostScript files. Otherwise, please use the Comment section to inform us: "Attention: InDesign file. Convert to PS, please". PDF
We do not accept files in formats other than listed above.
Please note: In case of INDESIGN software, we accept only PostScript files. Otherwise, please use the Comment section to inform us: „Attention: InDesign file. Convert to PS, please"
| | Additional Information |
- All fonts within the job have to be supplied with the application file. They could be also converted into curves before saving but please remember it may lead to slight type bolding..
- When saving to a PDF file, set the graphics to high resolution. Save your PDF files as PDF/X, PDF/X-1a or PDF 1.3 (Acrobat 4.0.)
- As we use automatic imposition, you are asked to put all pages in one file.
For complex projects with multiple layers, overlapping graphics, shadows, transparencies etc., as far as possible, flatten to a single background image, retaining texts, logos, lines and other important elements of the project in the vector form only. In particular, this problem concerns CorelDRAW X4, where in extreme cases, despite a good-looking PDF file, the printout may contains errors.
|
|
| Additional Information | | Please keep in mind that due to differences in printing technology and colour presentation, some differences in colours may occur also when compared to inkjet printouts or colours displayed on a computer screen.
Office programmes, especially Word, automatically format page to match the requirements of default system printer. When you choose a printer Word programme reformats the page which can result in spilling texts, tables and changes in page division. To avoid this please set (before book formatting) as a default system printer our driver >> (your artwork will be saved there as a postscript) and choose proper paper size in the properties of this printer.
In case of saddle-stitched booklets please remember that booklet has to consist of min.4 pages or multiple of 4. If the number of pages cannot be divided by 4 then empty pages are added at the back (so to reach the number of pages divisible by 4). |
|
|
|
|
|