| Sizes | | Final Trim Size | Maximum final trim size should not exceed the printable area of the press (1250 x 2480) and is limited by the size of the selected material (see the reference table for media sizes).
Minimum final trim size is 100mm x 100mm. | | Full Bleed Size | Your artwork should contain a multi-page file with the number of pages depending on the selected printing technology (see below). The first page should contain the CMYK design. If white colour is used, it should be on the second page.
For double-sided print, add additional page(s) to the file.
On the last page, design the trim/milling marks according to the instructions below.
The cutting plan should be designed as the front side of the finished piece (important for single-sided materials and in case of cutting)

Cutting plan design -> Finished piece
All pages (graphics, white, trimming) must be identical with regards to size and orientation. Objects on different pages must be situated in identical positions on the page, so that correct matching of the image with its underprint and the face with the back and with trim marks is possible. The operator matches the pages without intervening in its content, so any inaccuracies may lead to incorrect results that are not covered by warranty.
If your artwork consists of more than one page, save all pages as a single file. If the selected format does not allow this, save individual pages in separate files with appropriate names (e.g.: artwork_face.tiff, artwork_face_white.tiff, artwork_back.tiff, artwork_back_white.tiff, artwork_trimming.pdf)
| | Bleed | One-sided jobs – design with 3 mm bleed.
Double-sided jobs and/or jobs intended to be stuck to stiff surfaces – design with 5 mm bleed. |
|
| Trim and crop marks | Trim marks and any aperture outlines should be marked with a black hairline (100% M + 100% Y), while crop marks should be designed as brown hairlines (60% M + 60% Y + 40% B).
We use one of the following technologies for trimming and/or cropping, depending on the selected material: a knife or a milling cutter. When designing trim marks, please follow the instructions for the selected material:| Material | Trimming technology | Minimum curve radius (R) mm | Inner vertices | Outer vertices | 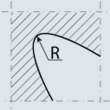 | 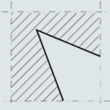 | 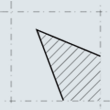 | | PCV 2-3mm | knife | 6 | acceptable | acceptable | | Kappa 5mm | knife | 10 | acceptable | acceptable | | Kappa 10mm | knife | 15 | acceptable | acceptable | | Tusand 10mm | knife | 15 | acceptable | acceptable | | Other materials | frez | 4 | unacceptable | acceptable |
Please note: trim marks that are not designed according to the above instruction may cause tearing of the edges.
Considering the duration of trimming, while designing:
- You should use straight lines instead of curved lines wherever it is possible.
- You should not increase the number of vertices more than necessary for the delineation of the curve.
- You should try to connect lines in such way that there would be only a few long, connected lines instead of many short lines in your artwork.
- Trim marks cannot overlap.
- Trim marks must take on the form of closed lines.
Please note!
If, due to the complexity of shape or non-optimal preparation of a file, the plotter operation time increases significantly, D&D reserves the right to change the price. The client will be informed of this before the job is carried out. |
|
| Printing technology | Arizona 360 GT is equipped with an option of white colour print, which can be used as an independent colour
or as a necessary background to enable real colours to be achieved, when applying CMYK overprint on colour and transparent media.
Depending on the selected printing option, prepare your artwork as follows: | | Arizona 360 GT - CMYK | | Single overprint of media without the use of white colour. Pre-press preparation with no additional requirements. | | Arizona 360 GT - CMYK + White | Your artwork should consist of two pages:
- The first page with a colour artwork in CMYK.
PLEASE NOTE: All elements on this page composed of CMYK – 0,0,0,0 (i.e. 'WHITE') or without an assigned colour will remain unprinted.
- The second page with an artwork for white print. Prepare your artwork as 100% Black (K 100) without other components (meaning 'Print WHITE here').
Order of printed layers:
- Overprint of transparent (clear) non-self-adhesive media is done as a mirror image (prepared by the operator).
Order: Viewer → Transparent medium → CMYK → White
- Overprint of transparent (clear) self-adhesive films is done without the mirror image effect.
Order: Viewer → CMYK → White → Film → Glue
If a different layer order is required, please provide clear instructions in the comments section.
For example: a window pane sticker applied from the inside.
Please write: Viewer (window pane) ˃ Glue ˃ Film ˃ CMYK ˃ White – Mirror image | | Arizona 360 GT - for Light Boxes | Double overprint (CMYK + CMYK) of light-dispersing media or CMYK + WHITE + CMYK overprint of transparent (clear) media that must be printed with light-dispersing layer.
Preparation - as for CMYK. White layer including the entire artwork is generated by the operator. | | Black Only | Black overprint only.
An additional option only for colour media to distinguish materials that do not allow photographic CMYK print without white underprint, but do allow simple black texts, such as black writing on yellow PVC.
In a CMYK file, the artwork objects contain only the Black (K) component.
In which case, black tonal gradations from 5 to 100% can be printed. | | White Only | Overprint of colour media only.
Preparation: Prepare white as 100% Black (K 100) without additional components
(meaning 'Print WHITE here').
White tonal gradations are not allowed due to low accuracy of the proportional rendering of white colour.
For text printed in White Only technology, minimum 10-point font size is recommended. |
|
| Graphics | | Colour Model | Prepare your artwork in CMYK model (except for artwork with additional colour). If your artwork contains halftone images (textures, photos), convert it also to CMYK.
Using different colour spaces or colour models in one document (e.g. CMYK and RGB) leads to incorrect colour rendering and is not covered by warranty.  | | Rich Black | | To achieve solid, saturated black, use black composed of the following components: 33%C 33%M 33%Y 100%K. | | Tone Gradation | Do not set your tonal range for values smaller than 5%.
Do not use tonal gradation for white colour. | | Optimum Resolution | 150 – 300 dpi
Don't increase resolution through resampling. |
|
| Saving to File | | File Formats | Accepted: *.CDR up to X4 (higher versions are not accepted due to exporting errors).
Please remember to outline all text.
* PDF in the PDF/X1-a format, or if your software does not enable exporting to this format - PDF 1.3 (compatible with ACROBAT 4.0).
Please remember to outline all text or embed used fonts in the file.
*. TIF in the flattened form without any additional Alpha channels. The only recommended and accepted inner compression is LZW.
*. JPG
| | Additional Information | If you save your artwork as CDR file, please rememeber to:
- convert all texts to curves / paths,
w przypadku skomplikowanych projektów zawierających wiele warstw, nachodzące na siebie grafiki, cienie, przezroczystości itp. należy, na ile jest to możliwe, spłaszczyć do jednego obrazu tła, zachowując w postaci wektorowej jedynie teksty, loga, linie i inne istotne elementy projektu.
- supply your artwork with a mock-up (200-300kB JPG file) so we can check correctness of a delivered file.
If your artwork consists of more than one page, save all pages as a single file. If the selected format does not allow this, save individual pages in separate files with appropriate names (e.g.: artwork_face.tiff, artwork_face_white.tiff, artwork_back.tiff, artwork_back_white.tiff |
|
|
|
|
|