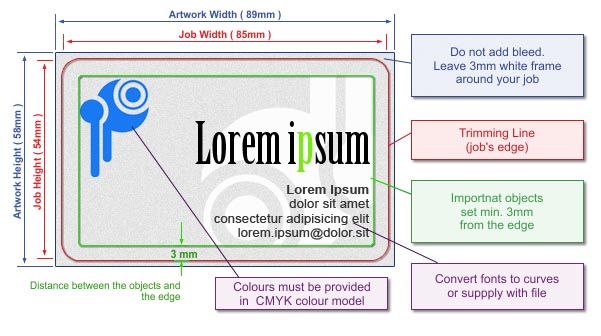
 | Sizes | | Final Trim Size | | Size 54 x 85 mm, rounded corners. (See the picture).
| | Full Bleed Size | Full bleed size should be 89 x 58 mm i.e. each edge of the page should be extended by 2mm.If some objects hang of the edges of the project, please cut them off to minimize file size and avoid difficulties with imposition. (See the picture).
Transparent and translucent cards cannot be printed to bleed.
PLEASE NOTE!
Even if your artwork does not have any background colours or design elements extended to the bleed area, always use the full bleed size. To ensure the correct size of your artwork, mark it out with a rectangle at the lowest layer (without any outline or filling), or for a bitmap, frame the artwork appropriately. | | Template | In order to make the designing of your business cards easier we suggest downloading a template to prepare your job with.
|
Download file:
|
| Rounded Business Card Template |
  | PLEASE NOTE! The template serves only as a pattern for designing your own business card. Before saving your artwork please remove the template. Otherwise they will be printed together! |
|
| Graphics | | Colour Model | Prepare your artwork in CMYK model (except for artwork with additional colour). If your artwork contains halftone images (textures, photos), convert it also to CMYK.
Using different colour spaces or colour models in one document (e.g. CMYK and RGB) leads to incorrect colour rendering and is not covered by warranty. | | Rich Black | To achieve solid, saturated black, use black composed of the following components: 33%C 33%M 33%Y 100%K.  | | Tone Gradation | Do not set your tonal range for values smaller than 5%.
| | Optimum Resolution | | Optimum resolution for bitmaps (graphics, photos) is 600dpi.
| | Layout | Turn the artwork by 90 degrees to check if bitmaps rotate correctly.
Set all texts on a separate top layer.
In case of saving your artwork as CDR file, please group all the objects and convert all fonts to curves/paths.
In your file please define your artwork size in accordance with above mentioned size and place your artwork centrally on a page.
If you save as EPS file the artwork which has no background (white), please frame it to above mentioned size.
Given the base positioning tolerance, there may be some shift in the job relative to the utility. Therefore, we discourage placing any kind of frames around the project, whose non-centricity on the utility can be seen.
All pages in the file should have been done in the same print orientation.
By default utilities are reversed "Head to Head". |
White Colour | UV plotter offers the possibility of white colour printing. This means that white colour only or CMYK colours with white underprint can be printed on colour and transparent materials.
To order products with white underprint, please prepare artwork containing 3 {dodstr} pages:
- the first page with colour artwork,
- the second page with white underprint (on colour and clear materials only),
- the third page with the shape for curved line trimming (only when this option is selected).
You can also prepare separate files – one with the colour artwork (with the word ”colour” added to the file name), the second with the underprint (the file with white underprint must have the word „white” in its name), and an optional third file with the shape to be cut out (with the word ”cut” in the name).
After doing this, compress the files together as ZIP or 7z.
For example:
personalised transparent cards, 60 colour cards with common underprint – file names:
cards_transparent_colour.pdf (60 color pages), cards_white_60x.pdf (1 black and white page).
Preparing a file with underprint
Copy your artwork to a separate file and change all colours to black (100% K). The change from black to white is done automatically by the printer software.
For small texts in black colour (100% black) the ground print isn't required.
PLEASE NOTE!
White objects defined as C0%,M0%,Y0%,K0% will be transparent in the printout. |
|
| Preparation for personalisation | For personalised print, you need to prepare an additional database. Instructions for preparing this are available in a different section:
See how to prepare personalisation |
|
| Saving to File | | File Formats | Preferred: PDF
Accepted: CDR, TIFF, JPG (not recommended).
Please note: In case of INDESIGN software, we accept only PostScript files. Otherwise, please use the Comment section to inform us: "Attention: InDesign file. Convert to PS, please". PDF, EPS, PRN
Accepted: CDR, TIFF, JPG (unrecommended).
We are adding the extra fee 3,5 pln, for the preparation of the pdf file to orders with jpg files.
Please note: In case of INDESIGN software, we accept only PostScript files. Otherwise, please use the Comment section to inform us: „Attention: InDesign file. Convert to PS, please"
| | Additional Information | When saving to a PDF file, set the graphics to high resolution. Save your PDF files as PDF/X, PDF/X-1a or PDF 1.3 (Acrobat 4.0.)
If you have text in your artwork please remember to convert it to curves / paths or attach used fonts to your file (refers only to PDF files).
Don't convert texts to bitmaps!!!
If your artwork consists of more than one page, please save all pages in a single file. If the chosen file format does not allow for saving all pages in one file, please save them in two separate files named face and reverse. (projekt_awers.tiff, projekt_rewers.tiff)
In case of preparing separate files for finishing, please include in their name information, which sides concern.
If you send more than one file, please send them in ZIP format if possible.
In case of TIFF files please save them as single layer files, with no additional channels. For complex projects with multiple layers, overlapping graphics, shadows, transparencies etc., as far as possible, flatten to a single background image, retaining texts, logos, lines and other important elements of the project in the vector form only. In particular, this problem concerns CorelDRAW X4, where in extreme cases, despite a good-looking PDF file, the printout may contains errors. |
|
| Additional Information | | | Please keep in mind that due to differences in printing technology and colour presentation, some differences in colours may occur also when compared to inkjet printouts or colours displayed on a computer screen. |
|
|
|
|
|